Activating the page builder
1
If you are in the admin area click view site at the top to go to your home page.

2
Go to the page you'd like to edit. If you want to edit your home page make sure you are looking at your home page. If you want to edit your about page make sure you are looking at your about page.
Click Page Builder in the admin bar and the top of the screen.
Note: Your site has different types of "pages". The page builder is normally used only on web pages and sometimes blog posts. It's not used on sermons, events, staff, or photo gallery pages. Those pages are auto generated to make management quick and easy.

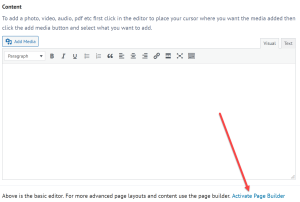 If you see edit page at the top the page builder is not active on the page. You can click edit page to open the basic editor. For some pages that may be all you want or need. If you'd like to activate the page builder on the page click the link below the basic editor.
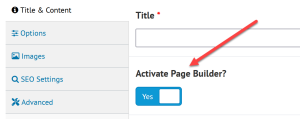 When creating a new page below the title is "Activate page builder?" click that then click publish and you will be taken directly to the new page with the page builder active.
Edit something on the page
1
A page is built using rows, columns, and modules.
- Rows are used to group columns together. They can be any size and can have different backgrounds.
- Columns live inside of rows and are used to position modules side by side.
- Modules live inside of columns and are used to display anything you want on the page. For example a text editor module is used for text, a photo module for photos and video module for you guessed it videos.
To the right you see an example of a new row with two columns. When you put your mouse on it you'll see a border around the entire row so you know what's contained in that row. At the top left you'll see 4 icons.
- The 1st icon is the move icon. You can use that icon to Drag and drop the row above or below other rows on the page.
- The 2nd is the settings icon click that to edit the row settings. This is where you add backgrounds and make any other changes needed to the row.
- The 3rd icon is the duplicate icon. Click that to duplicate the entire row with everything in it.
- The last icon is the remove icon. Click that to remove the row.

2
This is the same two column row from above. A text editor module has been added to the left and a photo module to the right.
Now when I put my mouse on the text editor you'll notice the row's icons are now gray at the top left and the module's icons are blue. Modules have the same icons with one addition.
- 1st is the move icon. Drag and drop that to move the module above or below other modules in the same column or to a different column on the page.
- 2nd is the settings icon. Click that to edit the module. In the case of a text editor this is where you'd edit the text, colors, fonts, spacing etc. In the case of a photo module, that's where you'd change the photo being displayed etc.
- 3rd is the duplicate icon.
- 4th is the column settings icon. Here you can add backgrounds or other changes to the column as well as move or duplicate the column.
- 5th is the remove icon.
So to edit the text on this page you would put your mouse on the text then click the settings icon.
Note: the settings windows can be moved by draging and dropping the top or resized by dragging the right side of the window. Very useful for editing text.

3
To change the column size, put your mouse on it, and you'll see a handle in the middle. Drag and drop that to the left and right to resize columns as needed.

Add something new to a page
1
- To add something new to a page click the + at the top left.
- In the menu that opens, you'll see modules for any type of content you can think of. Want to add a slideshow look for slideshow, want to add a photo, video, heading etc. Look for that module. You will also see tab at that top for things like rows and templates that you can add to pages.
- Drag and drop the item you want onto the page. You have three options on where to drop it.
1. In an existing column on the page. Drag it into the column when you see the horizontal blue bar inside on the column you want release the mouse button to drop it.
2. Add it to a new column in an existing row. Drag it to the left or right of any existing column and you'll see a vertical blue bar. If you drop it there it'll create a new column there and drop the module into the new column.
3. Add it to a new row. Drag it above or below any existing row on the page and the blue bar will go all the way across the page and you'll see "New Row" on it. Drop it there and a new row with one column will be added and the module will be placed in the new column.

Close the page builder
1
At the top right click done. Then almost every time you will want to choose the publish option to publish your changes.
Discard - Choose this if you want to undo the changes. This will undo any changes since the last time the page was published.
Save Draft - Choose this if you want to save the changes you made but you don't want people to see the changes. For example maybe you started making some changes but are not finished and you don't want people to see the unfinished changes.
Publish - This is what you want 99% of the time. You want to publish the changes so people see the change on the page.
Note: If your site is on the development server you want to publish changes. That will not make your site live. It'll just make it so you can see the changes you made on the site. When you are ready to go live you'll contact support@churchdev.com and they will move your site and help you connect your domain name to the new site.


 Add your logo in the admin